
As an important step towards automating the creation of Windows disk assets/images, we will take a closer look at the Critical Device Database (CDDB) inside the Windows registry. The goal is to transform any locally installed instance to be bootable from iSCSI without having to run a full installation onto an iSCSI disk before.
In the second part of the iSCSI mini-series, we identified the necessary changes to a normal Windows installation to make it network-bootable. We relied on a previously completed installation to obtain the corresponding registry entries. In this article, we will take it one step further and construct these entries from information we collected using Windows PE.
The CDDB dissected
If you recall this screenshot from the previous article, the CDDB entry was located under the PCI#VEN_xxxx&DEV_yyyy subtree.
We will now go through this entry piece by piece to find the essential parts we need for constructing our own CDDB entry.
Generic driver information

Right at the top of the entry, we find information about the driver that belongs to this critical device. The important ones are ClassGUID and Service. This tells Windows that the device is a network adapter, and the corresponding driver service is called E1G60. These two values are the essential ones we have to keep in mind. The only variable here is the service name, and this is very easy to determine from either the driver’s .inf file or the registry of a running Windows PE with the driver installed.
The device location (a.k.a. DevicePaths)
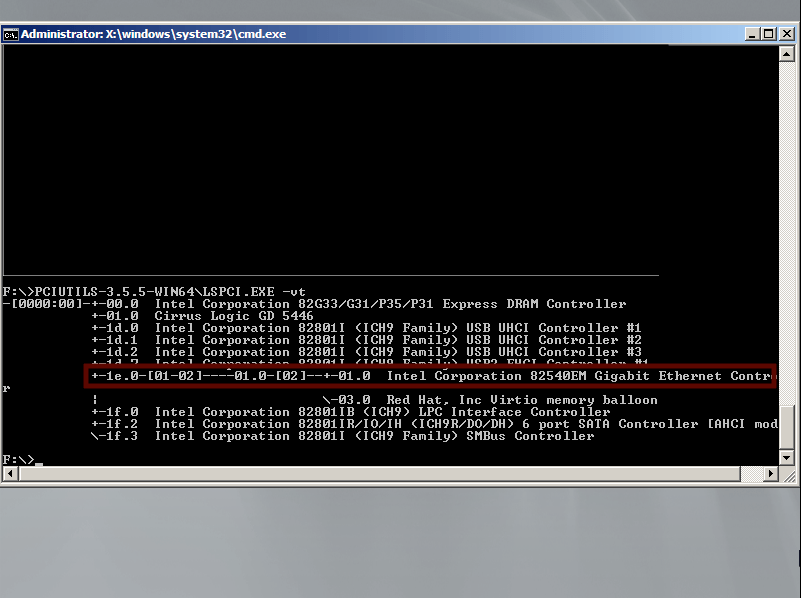
The device path describes the location of the device within the PCI tree. In our case, it is PCIROOT(0)#PCI(1E00)#(0100)#PCI(0100). This corresponds to the following lspci -vt output:

lspciis not included in Windows PE by default. You can obtain it by downloading the pciutils package.
In order to understand the mapping of this output to the identifier used by Windows, we have to lay some basic PCI knowledge foundations. Windows takes into account the tree property of PCI. Branching off the root bridge (bus 0), there can be additional bridge devices, providing more buses. Devices can provide multiple functionswhich essentially translates into unique identifiers for PCI devices (bus, device, functionor BDF). Executing lspci without the tree switch -t yields a representation of the PCI bus using those identifiers. For more detail on PCI, you can check out dedicated articles, e.g. on osdev.
We can now analyze how the device path is constructed: Every section describes a node within the PCI tree (either a bridge or the actual device). In our example, there is a PCI bridge attached to the root bus PCIROOT(0) with device number 1e and function 0. The remaining path sections are of the form PCI(DDFF)where DD stands for the device part, and FF for the function part. For the first bridge, this results in PCI(1E00)the second becomes PCI(0100). Finally, the device itself is listed as device number 1, function 0, which also becomes PCI(0100).
Now that we found our first two important puzzle pieces, we can move on to examine the actual contents of this entry.
Hardware Key
Usually, this part does not contain a lot of essential information, but it has a striking similarity to the Enum section of the registry, which can be found under HKLM\SYSTEM\CurrentControlSet\Enum\PCI. In there, you will find a similar VEN_xxxx&DEV_yyyy key, which in turn contains a subkey called Device Parameters. This subkey directly corresponds to the HardwareKey section of the CDDB entry.

The Enum section lists all devices that Windows has enumerated in a running system. That means it is possible to extract this from Windows PE as well, as long as the hardware is present.
One noteworthy quirk is that there are elements in there that interfere with the boot process and have to be removed before importing them to the CDDB. At the time of writing, these are InstanceIndex, Routing Infoand Affinity Policy - Temporal. Furthermore, a value named PreInstalled=1 is added.
Software Key
The Software Key subkey contains far more values. From the looks of it, this is basically the entire driver configuration, plus some settings for how Windows handles this driver. It is difficult to tell which values are absolutely essential, because they appear to be somewhat interdependent. Luckily, this section again has a striking similarity to another spot in the registry, this time under HKLM\SYSTEM\CurrentControlSet\Control\Class\{4D36E972-E325-11CE-BFC1-08002BE10318}.

This subtree contains a list of network devices Windows has configured. Most of them are internal devices like Miniports, but there will be one that contains a field called DeviceInstanceID that matches the device and vendor ID of the network adapter. The subkeys of this entry need to be copied to the SoftwareKey section, with some modifications.
First of all, values that do not correspond to driver parameters (listed under Ndi\Params) should be removed, except for NetCfgInstanceId, *IfType, *MediaTypeand *PhysicalMediaType.
Furthermore, four additional values need to be added:
PreInstalled=1BootNIC=1Characteristics=dword:00000084BusType="5"
The Service Entry
The last missing piece is the service entry that describes the actual driver. The essential value here is the ImagePathwhich contains the location of the driver binary. This entry can be found in a running Windows instance under HKLM\SYSTEM\CurrentControlSet\services\<service_name>.

This entry can also be copied to the same location in the new image. The only modification that might be necessary is to remove the subkeys Enum and Parametersif present.
Putting it all together
With all those puzzle pieces together, we can summarize the steps to transform a local disk installation:
- Boot Windows PE (in our case, based on Windows 7) on target machine
- Retrieve
lspcioutput and determine device path - If necessary, load network driver (
drvload <driver.inf>) - Export class, enum, and service entry
- Determine PCI vendor/device id
- Construct CDDB and service entries from the obtained information and registry values
- Apply the registry changes to the installed OS (either offline or by booting it from disk)
Caveats
The biggest drawback is of course that a machine with the respective hardware is still needed. Unfortunately, any attempt to forge the CDDB entry just from driver files has failed so far. The CDDB mechanism has proven to be fairly sensitive to missing or incorrect information. But the method we discussed in this article is definitely a significant improvement to the previous approach of installing to an iSCSI disk to retrieve the entries.
Given this method, it is possible to incorporate necessary registry modifications in an automated deployment process. Creating or duplicating golden images is very simple, as well as customizing installations during deployment.
For example, given a golden image of a stock Windows 7 installation, customizations can include different sets of software, drivers, or even updates. As an example of this use case, we will discuss deploying an updated Windows 7 image using the Microsoft Deployment Toolkit in an upcoming article.
Source: https://www.cyberus-technology.de/posts/2018-03-26-windows-on-iscsi-part3.html