
This series of three posts is about installing Windows 7 on an iSCSI disk. In this first article, we install it using qemu and iPXE and cover some of the pitfalls and particularities of this install method, as well as the topic of duplicating the resulting disk for use in machines of the same type. Two more follow-up posts will cover details of the network boot process, leading to a method of converting an existing installation to be iSCSI-bootable.
As a company that develops their own virtual machine monitor, we have a strong need for testing it with all supported guest operating systems, on all supported hardware platforms. Therefore, we require a system that allows us to:
- quickly deploy operating systems and test software to the system under test
- easily incorporate more machines of an already existing type
- rapidly revert to a golden snapshot while preserving previous state for inspection
A technology that satisfies the first two requirements out of the box is iSCSI. Simply put, iSCSI decouples the disk from the computer and allows you to connect them via network. As a result, test systems don’t need a physical disk anymore, all the storage can be consolidated onto one powerful server. Once installed, such disks can easily be duplicated on the server for other machines of the same type.
With the appropriate file system support, the third requirement can also be fulfilled by using snapshotting and copy-on-write techniques.
This promising set of advantages warranted to incorporate support for attaching iSCSI disks in our test automation framework. We just needed to install Windows on iSCSI disks and should be ready to boot from them using a simple configuration switch.
Prerequisites
In this article, we focus on installing Windows 7 on iSCSI. Setting up an iSCSI server is not covered, because there is a great variety of options. We also assume a working qemu/kvm installation and basic familiarity with the iPXE bootloader.
Installation
Even though the common installation media for Windows don’t include any hints, Windows 7 supports to be installed onto an iSCSI disk out of the box.
The heart of the boot process using iSCSI is something called an iSCSI Boot Firmware Table (iBFT). In simple terms, this table informs the operating system about an iSCSI connection to a target server. More information can be found e.g. in the iSCSI Boot Firmware Table Documentation provided by IBM.
This table is assembled by a compliant loader, which can be an iSCSI-enabled network adapter, or a software solution like iPXE. Given the versatility of such a software loader, we will limit our attention to iPXE in this article.
In order to boot from the installation media with the iSCSI disk attached, we need:
- A Linux version of iPXE (
ipxe.lkrncan be obtained from rom-o-matic, or built from source) - A boot configuration for iPXE (
iscsi.ipxesee example below) - A virtual machine configured with at least a network adapter, the installation media as ISO image as CDROM drive, and direct kernel boot with
ipxe.lkrnas the kernel andiscsi.ipxeas the initial ramdisk
A simple iPXE boot configuration could look like this:
#!ipxe

dhcp

# iSCSI credentials
set username <iscsi_user>
set password <iscsi_password>

# Preserve connections
set keep-san 1

# Initiator IQN and target path, according to your specific environment
set iniator-iqn iqn.2018-03.<tld>.<domain>:<client_identifier>

set root-path iscsi:<server_ip>::<server_port>:<lun>:iqn.2018-03.<tld>.<domain>.iscsi:<target>

# Hook drive and continue normal boot
sanhook --drive 0x80 ${root-path}
exit
This will instruct the loader to connect to the iSCSI target, record it as the first boot drive, and then continue with the normal boot order. If all goes well, you will end up in the Windows setup after a while.
Note that the boot time increases significantly when iSCSI is involved.
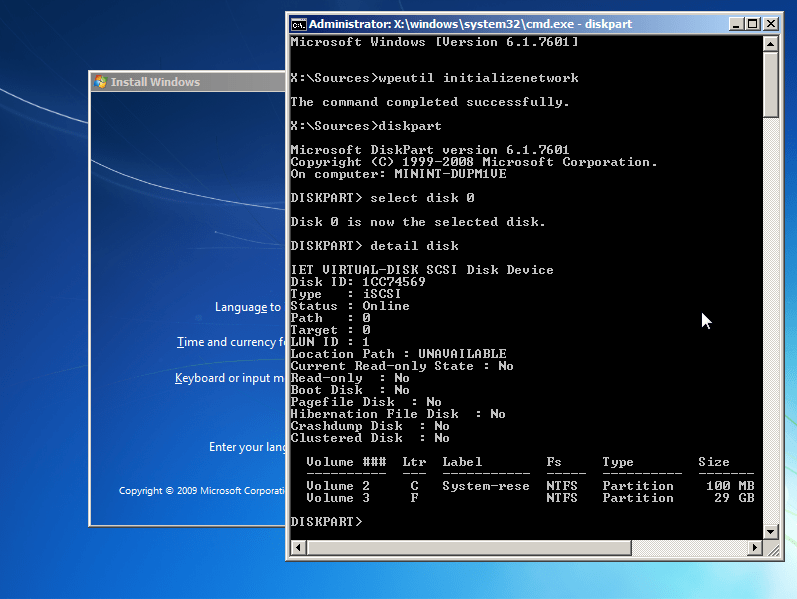
There are two important things to keep in mind when handling iSCSI disks in Windows. Firstly, the driver for the network adapter has to be available. If it is not a built-in driver, you need to load it manually, e.g., using drvload <driver>.inf. Secondly, Windows does not always initialize the network when booting into the setup process, so it might be necessary to open a command prompt (Shift+F10) and execute wpeutil initializenetwork.
You can verify the presence of the iSCSI disk using diskpartassuming you don’t have any other storage attached to the VM. The output should look similar to this screenshot, depending on your specific iSCSI setup:
As you can see, the disk is of type “iSCSI”.
You can now proceed with the normal installation. The iPXE boot setup automatically boots from the attached disk if the CD/DVD boot is skipped.
While we use qemu for this article, the approach is easily applicable to physical machines. iPXE can be booted via network (PXE), and the installation media can be a USB drive.
Image Transfer
Once the image is ready, it is possible to duplicate it to boot several machines of the same type. Unfortunately, the Windows installation is tied to the specific hardware, which makes it difficult to boot from the created image from another machine, even if it is the same hardware configuration. The most common outcome of the attempt to do so is the infamous STOP 0x7B: INACCESSIBLE_BOOT_DEVICE error message. This occurs when Windows fails to recognize the network adapter as the boot device, and as a consequence the network connection to the iSCSI drive is lost.
More information on this can be found in Microsoft’s Knowledge Base Article.
In this particular scenario, there is an easy solution to the problem: Setting the filter driver from required (1) to optional (2) via the registry:
HKEY_LOCAL_MACHINE\SYSTEM\CurrentControlSet\Control\Network\{4D36E974-...}\{B70D6460-...}\Ndi\FilterRunTypeThis change makes it possible to boot the same image from a different machine (given that the network adapter is of the exact same model).
Pitfalls
While testing this setup within our automation infrastructure, it became apparent that the network disk sometimes interferes with management technology (e.g., AMT, IPMI). For example, being connected via AMT SOL or KVM while booting from an iSCSI disk can result in a loss of connection. The same is true for co-located IPMI/test network connection (which consolidates two MAC addresses onto one ethernet port). The workaround for these issues is careful timing of connections to the management functionality and using dedicated management LAN ports when possible.
Summary
We have seen how Windows 7 can be installed on an iSCSI disk using iPXE in a virtual machine environment. By transferring this process for deploying a physical machine and preparing the disk image for booting on different machines, this proves suitable for use in an automated OS testing framework.
While it is feasible to install Windows directly onto an iSCSI disk for every machine in the test cluster, it can become very time-consuming and difficult to maintain over time. A better solution would be to prepare a “golden image” in a VM using a normal virtual hard drive, making all the customizations, and then preparing this image to be booted from an iSCSI disk. Unfortunately, due to the nature of the network boot process in Windows, this proved to be more complicated than expected. However, we found a working solution, which will be the subject of the remainder of this series.
Finally, as a last step of automation and reproducibility, such a golden image can be used as a base image that can be deployed with well-defined customizations using dedicated tools, such as the Microsoft Deployment Toolkit (MDT). This will be described in another follow-up article.
Source: https://www.cyberus-technology.de/posts/2018-02-26-windows-on-iscsi-part1.html