

Now that you have a good overview of the Scrum methodology as well as a first look at how it is mapped in Jira, let’s dive deeper into the technical aspects. The focus here is on the Scrum template integrated in Jira. We therefore look at what it entails, how it can be used and provide best practices for its use.
Scrum with Jira
Jira provides its own template for Scrum. In order to be able to use these, you must have the Jira Software module, in which a project can then be created with this template. Here we have opted for a team managed project. You can find out more about “Creating projects” in our first webinar and blog.
Initially, this template provides the following features: roadmap, backlog, board, sprints, estimate, code and linking options to project pages in Confluence. In addition, the modules reports, process navigator, releases, deployments and on-call can be switched on. These options can be found below Project Settings -> Functions. The most important modules for mapping the Scrum process are the backlog, the board and the roadmap as well as parts of the reporting module. The other modules can therefore offer a supporting function of the process and reflect the following aspects:
-
- Code: The Code module offers the possibility to integrate the version control platform for software development projects directly into Jira. This creates greater transparency for the developer work.
-
- Releases: Different versions for a delivery product can be created under Releases. These are named and a start/release date can be assigned. The versions created here can now be selected in the processes/tickets in order to assign them. The release can be published at any time. If this contains tickets that are not yet completed, they can be ignored or assigned to a different version.
-
- Deployments: The Deployment module offers the possibility to integrate the version control platform for software development projects directly into Jira. This allows you to keep track of deployments in Jira.
-
- On call/standby: The On-Call/On-call module offers the possibility to integrate OpsGenie with Jira. Here the on-call plans can be managed directly in Jira.
Sprints in Jira
In Scrum you always work with sprints: How do I prepare my sprint in Jira?
Initially, all current backlog tickets should be created together in the team. When working with epics, we start in the Roadmap module. To do this, we start in the backlog module. Here you can turn on/off an epic panel under the menu item and create epics as you like. New or existing tickets are added to this epic using the “+Epic” button.
(Source: Vanessa Schreuder and Gresa Nuredini, CONET)
When creating a new ticket, a story ticket is automatically opened, which can be named. To change the ticket type, press the small green icon. A task or bug ticket can be made from the story ticket, since these three process types are initially stored. Of course, further process types can be created under the process type management in the project settings or the predefined types can be adjusted. If you want to learn more about this, please have a look at our first webinar or the blog article.
These tickets contain the following predefined fields:
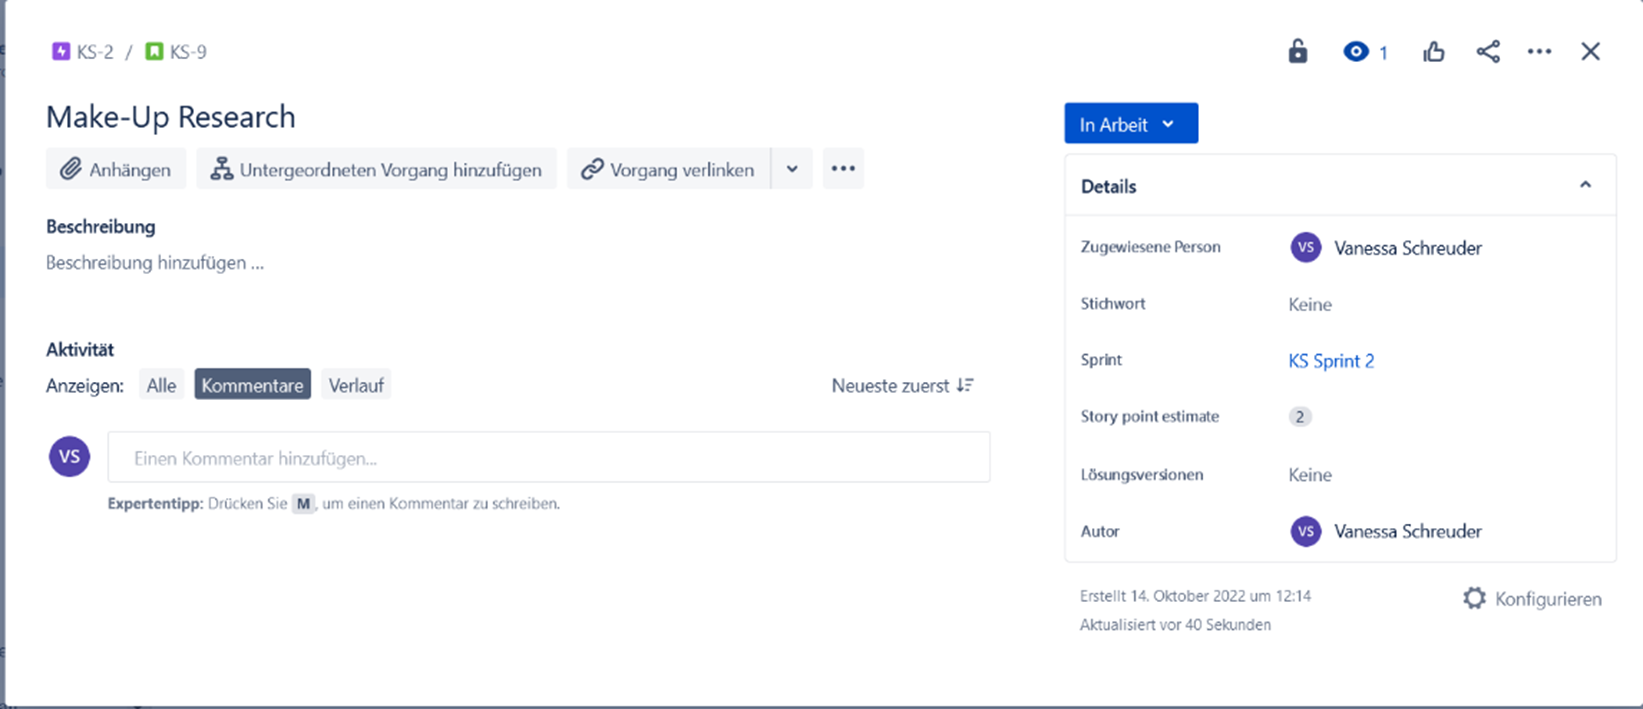
(Source: Vanessa Schreuder and Gresa Nuredini, CONET)
The following fields are of particular interest to us:
- Sprint: The respective sprint to which the ticket is currently assigned is displayed here. This field can be switched on/off under Function in the project settings.
- Story Point Estimate: This is where the story point estimates for the story can be documented. This field can be switched on/off under Function in the project settings.
- Solution version: The version of the release can be stored here. This field can be switched on/off under Function in the project settings.
All epics and tickets created here can also be found in the “Roadmap” module. Here the start and end dates can be assigned to the epics via drag and drop or in the ticket. Since Jira initially creates the first sprint, you can already find it in the roadmap. Further sprints are classified here. The releases created are also shown in the roadmap – in our case the releases of the costume, the wig and the make-up.
(Source: Vanessa Schreuder and Gresa Nuredini, CONET)
Create sprints
How do I create my sprints in Jira?
The initially created sprint is already in the backlog. This can be filled with tickets using drag-and-drop. You can define additional sprints using the “Create sprint” button.
If the tickets are assigned to the sprints, the sprint is started with the “Start sprint” button. Here you can customize the sprint name as well as the duration and start date of the sprint. Jira offers predefined lengths of one to four weeks – however, custom sprint lengths can also be set. All settings can be completed and adjusted using the three dots next to “Start sprint”. You can also delete sprints here.
(Source: Vanessa Schreuder and Gresa Nuredini, CONET)
The board also features a minimized reporting feature under the Insights section, where you can see ‘Sprint Commitment’ charts and an ‘Issue Type List’.
Working with Scrum
At the start of the sprint, you will be forwarded directly to the board, which is now being worked on for the selected duration.
This board initially contains the column tasks “In progress” and “Done” with the standard workflow “To-Do”, “In Progress” and “Done”. These are also customizable. As shown in our first webinar, columns can be added simply by using the plus. Here you can find more board settings via the three dots at the top right. There the statuses can be assigned to the columns of the board. This means if we have multiple statuses that belong to the “In progress” column, both can be mapped to that column. The workflow editor can also be accessed via the settings. What you can do with this one is in our previous blog.
(Source: Vanessa Schreuder and Gresa Nuredini, CONET)
If we want to create individual filtering for the board, this can be set here via user-defined filters. To do this, you name this filter and specify a JQL. Jira Query Language (JQL) is the Jira specific query language. Jira also offers a Cheat Sheet for all queries that are possible.
Jira offers some predefined filters:
- Filtering of own assigned tickets
- Filtering by specific assigned person
- Filtering by Epic
It also offers predefined groupings of tickets:
- assigned person
- Epic
- Sub-Task
In the board settings you can also switch the following functions on/off:
- Show attached images in tickets as issue title image in the board
- View child issues in the roadmap
In the board, Jira provides rolling reports under the Insights button, where you can see the current sprint progress, sprint burndown, and epic progress.
In addition, Jira offers the following report types in the Report module:
- Burn-up-Diagramm
- Sprint-Burndown-Chart
- Velocity Report
- kumulatives Flussdiagramm
- Lead Time Report
- Deployment Frequency Report
You can create these reports for all or specific sprints.
End Sprints
Jira does not automatically close sprints, this must be done in the board using the “Close Sprint” button. You can use this feature to close a sprint at any time. If you close the sprint, you can decide whether the unfinished issues are moved to the new sprint or back to the backlog.
(Source: Vanessa Schreuder and Gresa Nuredini, CONET)
We have now closed our sprint and can now either end the project or start the next sprint.
Conclusion
The Scrum method is a good approach to managing agile projects and Jira offers the right tool support here.
The most important aspects of Scrum, such as product backlog, sprint backlog, sprint execution and documentation of work in the sprint, are mapped in Jira.
This article was intended to provide an overview of how Jira works: We have explained how to create the sprints, how to prepare them, how to work with them and how to end them. If you are interested in a more in-depth approach to Scrum in Jira, please attend the webinar at the link below and follow the steps to experiment with your own projects.
Webinar: Successfully master everyday project management with Jira
In this webinar we dive even deeper into the Jira world. We demonstrate how teams work together using the Jira Software module. Using an example, we will guide you step by step through project management and give you an insight into sprint planning according to Scrum in Jira Software.
To the webinar recording

Gresa Nuredini has been working at CONET as a junior consultant since January 2022 and supports in the area of service management for JIRA.

Vanessa Schreuder has been working as a junior consultant at CONET since April 2020 and advises internally and externally in the area of service management with a focus on Atlassian products.
Source: https://www.conet.de/blog/agiles-arbeiten-mit-jira-leicht-gemacht-iii/